Debian 10 Active Directory Domain Controller with Samba: (1) Install and Prepare the OS
This is part of my series of how to get an active directory domain controller working with Samba on Debian 10.
This first post is how to prepare the network and install the operating system to prevent issues later.
TL;DR: If you’re used to spinning up VMs, the difference here is you’ll want to set a static IP address and make sure any automatic DNS resolver setup is disabled.
With that out of the way, I’ll go step by step for a VMWare virtual machine creation and setup in Debian’s installer.
(Virtual) Machine Preparation
These are the steps to prepare a virtual machine (VM) on VMWare ESXi 6.7. There’s nothing VMWare specific in the install, so any hypervisor or real hardware that Debian 10 will run with can work. The settings will be about the same, but they will be presented differently.
- Log in to the ESXi host.
- Select “Create / Register VM”; Next
- Select “Create a new Virtual Machine”; Next
- Under “Select a name and guest OS”:
- Pick any valid name (I used “pixis01”).
- Select Linux as the Guest OS Family.
- Debian GNU/Linux 10 (64-bit) as the Guest OS version. (If you have an older hypervisor, you can use the latest “Debian” or “Ubuntu” that the hypervisor does support: I think VirtualBox even has “Debian Testing” that would work.)
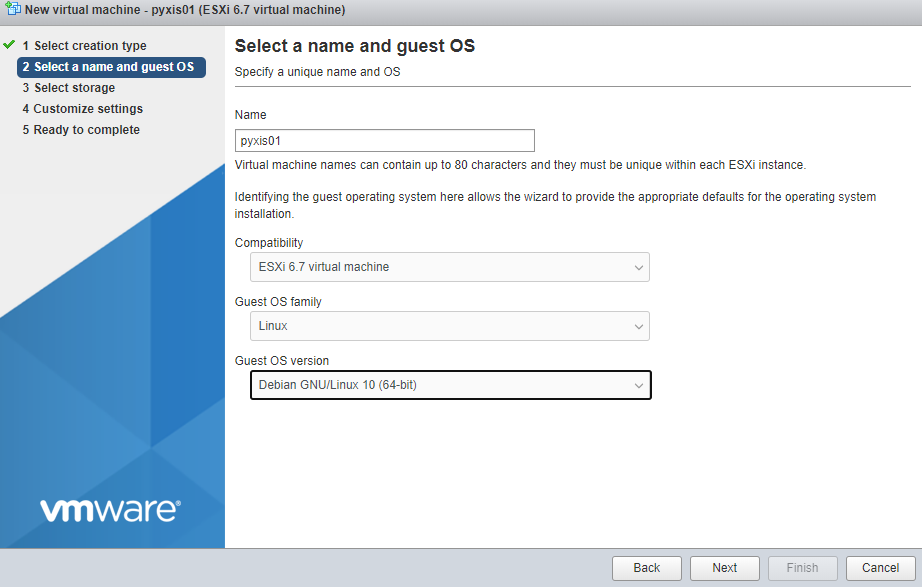
- Click Next
- Under “Select storage”, select any datastore you want (since we’re only going to ask for 10 GB of space); Next
- Under “Customize settings”:
- 1 CPU
- 640 MiB of RAM (my domain controller is using 283 MiB of RAM and it did hit the page file a little bit)
- 10 GB of disk (my domain controller is using 1.6GB of disk, but 10GB is still negligible on my hypervisor’s 500GB drive, and I don’t want some faulty update to kill the VM)
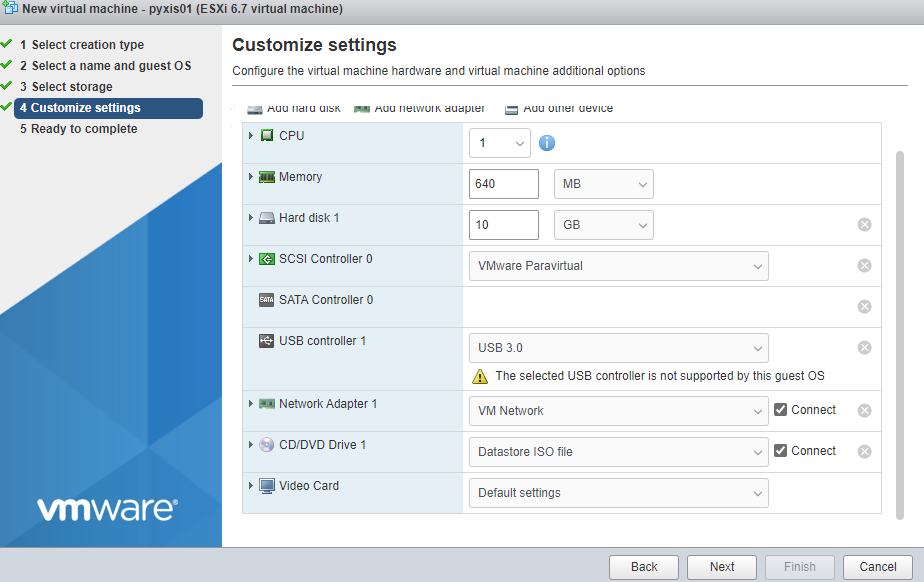
- Click Next
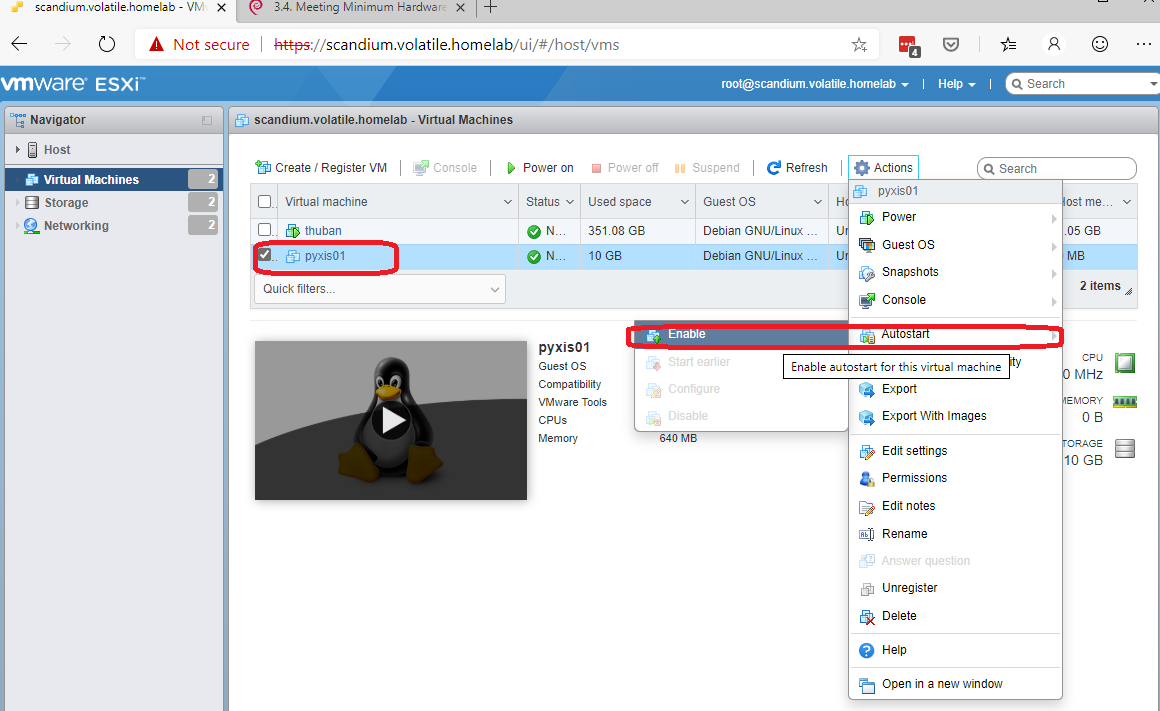
- Click Finish (and don’t start the VM yet: if it is on, turn it off again)
- Set the VM to automatically start up on boot of the hypervisor if you can. For VMWare ESXi, you can do that as follows:
- Select the VM (either on “Virtual Machines” tab or with the VM’s detailed page)
- Select Actions -> Autostart -> Enable
One thing to note is the VM’s resource usage is small compared to compute or database VMs: smaller the cheapest $5 per month VM available at some most cloud providers. Active Directory is just a little database with LDAP and Kerberos (plus Samba / Microsoft stuff), so you don’t go crazy with the CPU and RAM slider bars even though you may have a bunch of big machines depending on it. If you’re going in to a corporate environment you can go with a bigger machine, but in environments of that size, being able to use the newer Windows Server 2019 rather than Samba pretending to be Server 2008 R2 may be benefiial.
Operating System Installation
These are the steps from first boot of the machine to a platform you can start messing around with configurations and packages to get Samba running as a domain controller. This is a default install (blindly smashing next) except we are going to force a static IP address from the installation. …that said, the installer didn’t work out perfectly for me, and I’ll also list the steps to correct that.
Prerequisite: Debian 10 Netinstall is available (either mounted to the VM as a virtual disk or you have a real disk or USB stick)
- Boot up the machine (VM or real hardware if you chose bare metal)
- Select “Install” or “Graphical Install” (I use Install for this guide, but that’s just because I’m not clicking odd options that the grapical install does any better than the regular install.)
- Select the language according to your preferences (an English install would be better to follow this guide step-by-step, but we’re doing a very standard install here that should have no localization issues)
- Select the region or country according to your preferences (I chose Canada)
- If you have DHCP enabled like I do, GO BACK when it asks for the hostname under “Configure the network”.
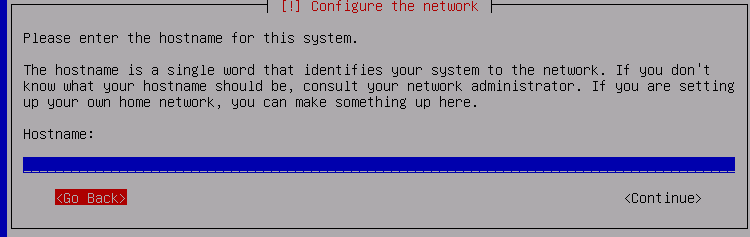
- If you don’t have DHCP on your network, it will fail out and you can choose to set up the network manually
- After going back or having the network configuration fail, under “Configure the network”, select “Configure network manually”
- Select all of tne netmask, gateway, and name server preferences. Your configuration WILL be different unless you make the network the same as mine, but I have:
- IP Address 192.168.211.30
- Netmask 255.255.255.0
- Gateway 192.168.211.5
- Name server address: 192.168.211.5
- (Note the gateway and the name server are my router: I intentionally make its IPv4 address not end in a .1 because there are random attacks that try to guess 192.168.0.1 or 192.168.1.1. It’s also fun to test if anything breaks when the router isn’t the first address in the network.)
- From the next few steps, it’s a standard install, so I’ll just list the options.
- Hostname: (something you want the domain controller to be called, I used pyxis01)
- Domain name: (it will eventually be the name of your domain, I used volatile.homelab)
- Root password: (Correct-Horse-Battery-Staple variants work because the big jumble of characters is annoying when you want to rescue the machine with a keyboard after its network connection dies)
- Regular user: (You won’t be using it much, or can even delete it after you get domain logins working)
- NTP time zone: (Pick the same time zone as other machines in your network to not confuse yourself)
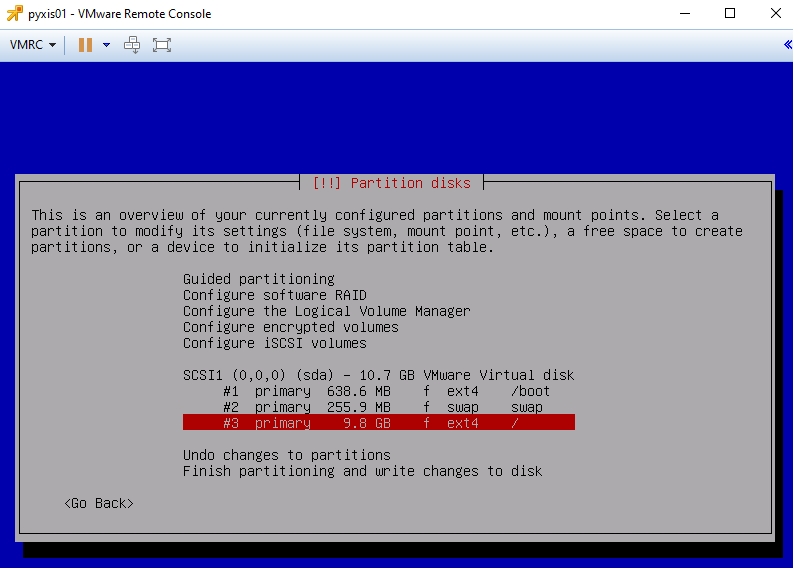
- If you want to be fancy for the partitioning, you can select Partitioning method: manual and reduce the size of the swap file. I used the following settings:
- /boot was 640 MB (although it survives at as little as 200 MB, enough dumb kernel updates where you forget apt autoremove and you fill that partition)
- (I’m using VMWare with legacy boot, but for UEFI devices, you’ll want to set a /boot/efi partition of around 150MB)
- swap 256 MB
- / root partition for the rest of the drive
- For question - Scan another DVD? No
- For question - Package usage survey? (I selected yes but it doesn’t matter)
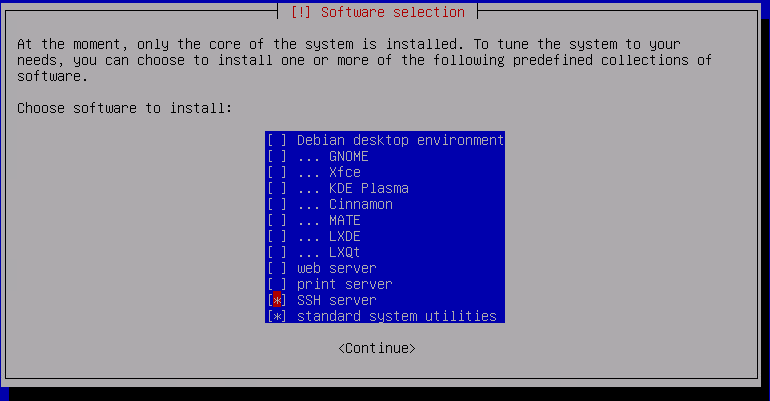
- Choose software to install: SSH server, standard system utilities, with no GUI
- Install Grub boot loader: The default, which for me was to install to /dev/sda.
- Keep clicking through more “Next” and “Continue” until your machine reboots. (I think the final prompt is “Restart” or “Reboot”).
Fixing the network configuration (Debian prior to 10.4)
Update: Debian 10.4 doesn’t have this problem, so skip this section if you are running a different Debian 10 installer
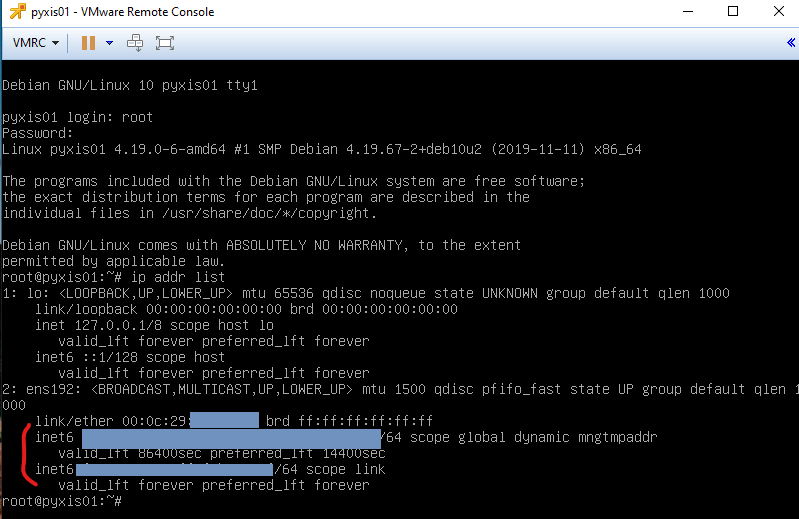
Oddly after the installation, my machine was unavailable at the IP address I configured. When I checked, by logging in through the hypervisor and using ip addr list, the machine had no IPv4 address.
The issue was that the /etc/network/interfaces file had no IP information. If you get the same problem:
- Start the nano text editor, default in Debian installs to open that file: ~
nano /etc/network/interfaces~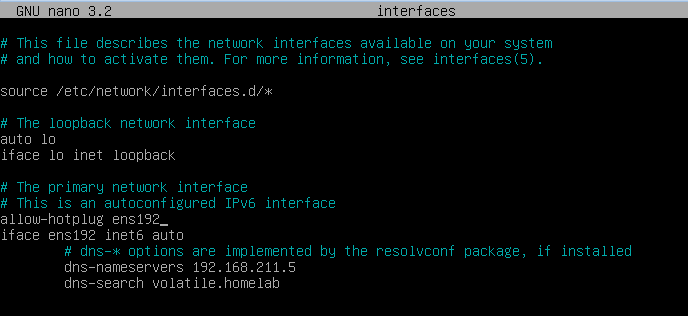
- For the screen reader folks, the main network connection for the machine had:
allow-hotplug ens192 iface ens192 inet6 auto dns-nameservers 192.168.211.5 dns-search volatile.homelab - Note that there is no IPv4 setting, usually denoted by
inetwithout the 6. The loopback adaptor was OK withiface lo inet loopback, so it’s possible the installer just failed setting my manual IPv4 settings.
- For the screen reader folks, the main network connection for the machine had:
-
Edit the file to add an
inet staticblock. Compared to my screenshot and description, you’ll have to replace the string after iface (ens192 for me) and the IPv4 addresses with ones that make sense for your network. My full block after edits was:allow-hotplug ens192 iface ens192 inet static address 192.168.211.30/24 gateway 192.168.211.5 dns-nameservers 192.168.211.5 dns-search volatile.homelab iface ens192 inet6 auto dns-nameservers 192.168.211.5 dns-search volatile.homelab- If you’re unfamiliar with the notation of
192.168.211.30, it’s just another way of saying a device address of 192.168.211.30 with the subnet mask being 24 bits. Watch a video on IPv4 subnets for that, or use subnet calculators including https://mxtoolbox.com/SubnetCalculator.aspx for reference
- If you’re unfamiliar with the notation of
- Reboot the machine, and hopefully it has a proper network connection.
Next Steps
This machine is now ready for the steps in part two