Debian 10 Active Directory Domain Controller with Samba: (2) Install Active Directory and Create Domain
This part of the Active Directory on Debian 10 guide is the main part of the installation, where you verify the packages are installed and you set up the domain proper. Note you need a static IP address set up, so refer to part one for that bit.
Configuring the OS and Installing Components
The first part is to configure the operating system so you can run samba-tool domain provision.
Overview
The steps to achieve these items are in the next subsection “Steps”, but essentially you want these:
- The machine is in its own hosts file
- Kerberos, winbind, ntp, samba, winbind, nsupdate are enabled
- The package resolvconf is disabled or uninstalled
Note on administering Debian 10 with su
All of these steps are performed as root.
In Debian 10 it is more important to use su - (with that minus sign) because the shell environment parameters don’t carry over in the same way without that minus sign. The su - is closer to logging in as root with a keyboard and mouse compared to, say sudo or su without the -. It’s part of the same disaster of Linux that makes it so the tools pyenv and rbenv have different places to modify files depending on the Linux distribution… That will also work on older machines, so it isn’t a bad habit to get in to.
Steps
Verify hosts file
- Open up the
/etc/hostsfile in a text editor:nano /etc/hosts - Verify there is an entry with the domain controller’s local network IP address, its hostname, and its fully qualified domain name (FQDN). For example, mine has a line
192.168.211.30 pyxis01.volatile.homelab pyxis01- Since we installed with a static IP address and set the host name during the installation, this should already be set up. Otherwise, create a line in the /etc/hosts with [IP address] [FQDN] [host name] and save the file
- Verify the machine can resolve itself by name by using
ping [host name]andping [FQDN].- For exmaple, since my machine is pyxis01.volatile.homelab,
ping pixisandping pixis01.volatile.homelabgive mePING pyxis01.volatile.homelab (192.168.211.30)
- For exmaple, since my machine is pyxis01.volatile.homelab,
Install and Configure Packages
- Verify resolvconf does not exist:
apt remove resolvconf- Either there should be no resolvconf package (e.g. the message is
Package 'resolvconf' is not installed, so not removed), or you can follow the prompts to remove the package
- Either there should be no resolvconf package (e.g. the message is
- Install the required packages for the samba install: Type in the command below and then see in the next few bullet points the answers to give to each of the questions the instaler makes. Anything in [] brackets are items that are specific to my setup and may change for yours.
apt install ntp samba smbclient samba-common-bin krb5-user winbind dnsutils- Modify smb.conf to use WINS settings from DHCP? no
- Default Kerberos version 5 realm: [VOLATILE.HOMELAB]
- Kerberos servers for your realm: [pyxis01.VOLATILE.HOMELAB]
- Administrative server for your Kerberos realm: [pyxis01.VOLATILE.HOMELAB]
Samba Provisioning
Checkpoint your work in case you mess up
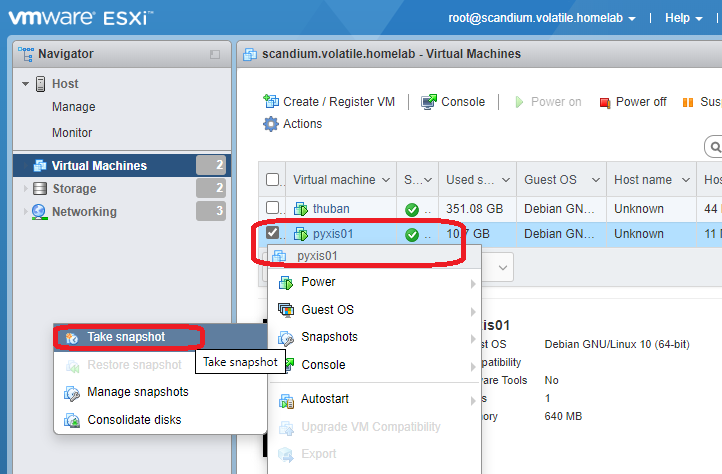
Note: Before going on to this step, if you are using a virtual machine, create a snapshot or checkpoint. For VMWare ESXi:
- Log in to the hypervisor
- Right-click on the machine or use the “action” menu, and select “Snapshots -> Take snapshot”.

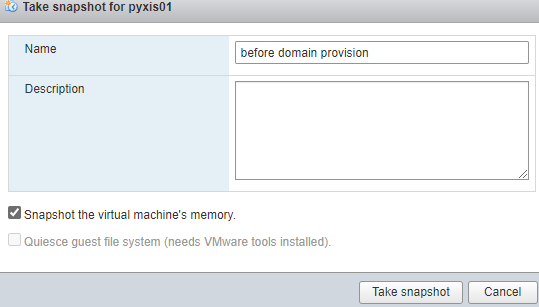
- In “Take snapshot for [VM name]”, type a name for the snapshot (I chose “before domain provision”), and click Take snapshot.

Domain Provisioning
- Verify all of the old samba services are off, and enable the domain controller feature using sustemctl. There’s five commands needed to do that, and each command is a separate line of the block below.
systemctl stop smbd nmbd winbind systemctl disable smbd nmbd winbind systemctl mask smbd nmbd winbind systemctl unmask samba-ad-dc systemctl enable samba-ad-dc - Remove the smb.conf file (some guides say to back it up, but I don’t see the need given we’re setting up a fresh machine).
rm /etc/samba/smb.conf - Start the domain provisioning tool:
samba-tool domain provision --use-rfc2307 --interactive- The –use-rfc2307 allows you to set some Unix configurations in the domain. My project may need it when I start messing with file shares, so I have it on.
- The samba-tool should now start asking you some questions. Here’s what you want to say, and anything in [] brackets are items that are specific to my setup and may change for yours. For (default), you just press enter because the correct option should already be selected.
- Realm: [VOLATILE.HOMELAB]
- Domain: [VOLATILE]
- Server Role: dc
- DNS backend: (default)
- DNS forwarder IP address: [192.168.211.5]
- Recall a (primary) domain controller is a DNS server, so this is the IP address to look at for any DNS lookups outside of the domain. If your router has DNS, you can use that. Otherwise, point to a public DNS provider including Cloudflare (1.1.1.1 or 1.0.0.1), Cisco/OpenDNS (208.67.220.220 or 208.67.222.222), Google (8.8.8.8), IBM (9.9.9.9).
- Administrator password: [Correct-Horse-Battery-Staple-Variant-1]
- Expect a bunch of output, and pay attention to a note about krb5.conf in there. My output was like this:
A Kerberos configuration suitable for Samba AD has been generated at /var/lib/samba/private/krb5.conf Merge the contents of this file with your system krb5.conf or replace it with this one. Do not create a symlink! Once the above files are installed, your Samba AD server will be ready to use Server Role: active directory domain controller Hostname: pyxis01 NetBIOS Domain: VOLATILE DNS Domain: volatile.homelab DOMAIN SID: S-0-0-00-1234567890-123456789-1234567890- I censored out that last output: it was actually more random looking than 123456 :)
- Note the blob of output told you about a file /var/lib/samba/private/krb5.conf that you want to copy to its default location. You can do that with the follwing (delete and then copy the file over):
rm -f /etc/krb5.conf cp /var/lib/samba/private/krb5.conf /etc/krb5.conf - Open up /etc/resolv.conf in a text editor:
nano /etc/resolv.conf - Verify there is a nameserver entry for your new domain controller’s IP address. (The machine should point to itself for DNS.) I edited my file to be:
search volatile.homelab nameserver 192.168.211.30 - Reboot the machine with
reboot - Test the domain controller and your resolv.conf setting by using
host -t SRV, substituting [volatile.homelab] in my example below for your domain name. (the _ldap._tcp is part of the domain controller so it doesn’t change)host -t SRV _ldap._tcp.volatile.homelab- The output should say your domain controller has the entry, like this:
_ldap._tcp.volatile.homelab has SRV record 0 100 389 pyxis01.volatile.homelab.
- The output should say your domain controller has the entry, like this:
- Test the kerberos login part using
kinit administrator - Type the administrator password when asked
Password for administrator@… - My output was as follows:
Warning: Your password will expire in 41 days(followed by a timestamp) - You should now be able to join other machines (including Windows) to the domain, as if it was a Windows Server installation. There’s other troubleshooting steps available at Samba’s official guide https://wiki.samba.org/index.php/Setting_up_Samba_as_an_Active_Directory_Domain_Controller in case stuff doesn’t work.
References
- Jonathon Reinhart. Domain Controller on Debian 9
- Chris Brown. Integrating Linux in a Windows Enterprise Environment
Updates
- December 10th, 2012: I found some of the DNS update issues (“No such file or directory”) of my domain were bcause of missing the nsupdate system application: I added the appropriate package dnsutils.
- If you installed without knowing this, you can just install the package and everything should be happy after all the timers for dynamic dns updates occurs. Otherwise you can force the sync with
samba_dnsupdate --verbose --all-names, source: https://wiki.samba.org/index.php/Testing_Dynamic_DNS_Updates
- If you installed without knowing this, you can just install the package and everything should be happy after all the timers for dynamic dns updates occurs. Otherwise you can force the sync with